
Each project requires certain leather thickness, or ounces weight to be more precise. (a topic I will cover in a subsequent posting). Presently, I will briefly describe the creative process of making a leather name band.
A) I select an area on the hide that is even in thickness and cut out the dimensions of the wristband using a utility knife. The thickness on the edges of the hide are thinner then that of the thickness in the center. This has to be carefully considered when making an item that requires a lot of leather.
B) Once it is cut I determine where the text/name will be stamped and dampen the leather with a sponge.
Some crafters use a pencil to draw a faint line on the leather but I prefer to eye-ball the line. When I have finished stamping the text or design I let it air dry.

C) When the leather is completely dry (that can be determined by the coolness of the leather. If it is damp it will be cool to the touch and darker in colour) I can apply the dye colour. If it is a gel dye I use my finger and rub it in vigorously into the leather. With liquid dye I use a wool dobber and apply it in a circular motion. Two coats are usually what I apply for an even finish. If I want a darker hue I apply more coats to the leather. I use a flat sponge brush to apply coloured liquid dyes.
I prefer liquid dyes for belts and bigger projects and gel dye for smaller project like wristbands and wallets. Liquid dyes do not work well with highlighting text so I have found.
Here I removed access gel dye from the leather
 D) After the dye as been applied and sufficiently dry I use a soft cloth to buff off any residual colour.
E) For best results I let the dye dry over night and apply three coats of eco-wise, waterproof finish with a wool dobber (I usually wait 10 minutes between applications). It is applied in circular motion with the excess squeezed out.
F) When the protective/sealant coat has dried it can be buffed with a clean cloth.
We will use shoe polish on larger items to give them added luster.
Dying takes some practice and can be quiet frustrating. A few factors that effect the dye finish are; drying out, age and temperature. If done incorrectly the dye may appear blotchy or streaky. If applied too thick it will crack and fall off in time. I have scrapped a few projects in the past due to this and it was a costly lesson. From these heartbreaks I have learned and acheived my own technique with which I am happy with.
G) When the dying process is finished the item is ready to be completed with snaps, lacing or stitching to create a stunning piece of fashionable jewelry.
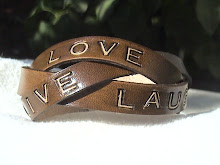
 The two sample wristbands were custom made and similar items can be created for you when you visit our Etsy or ArtFire shops.

I hope this post was helpful to folks that thought the leather in our personalized items started with coloured leather.
Thanks for dropping by!
Anne ^i^


Very interesting post! I enjoyed reading about your process and really like the results!
ReplyDeleteThx Sharla. I have learned to be more forgiving with myself when I critique my work.
ReplyDeleteAnne ^i^
very very awesome! thanks for sharing your work! they are beautiful :))
ReplyDelete